Wednesday, February 27, 2013

Chili Con Carne on Baked Potato


I used to cook Chili Con Carne using butter, ale, sour cream, full fat cheese... without any hesitations!

It was very tasty, but obviously not healthy at all. :-(

I therefore challenged myself to reduce the fat and calories from my recipe while retaining the same flavour and deliciousness, or creating an even tastier low fat Chili Con Carne.

I used unsweetened cocoa powder which has very low calories and at the end of cooking dashes of Lee & Perrins Worcestershire sauce which is I call British version UMAMI.

Try my Chili Con Carne recipe!  It is less fatty, but very delicious.


Ingredients for 4 people
1lb Italian mild sausage meat (all natural - no corn syrup!) or organic ground beef
1 tablespoon olive oil
1 large sweet onion, chopped
1 stick celery, chopped
3 - 4 cloves garlic, chopped
1 - 2 serrano peppers, seeded, removed membranes and chopped finely
3 teaspoons chili powder
1 teaspoon ground cumin
1 tablespoon unsweetened cocoa
1 can diced tomatoes
1 cup beef stock, dissolve granulated beef stock in twice strength
1 tablespoon tomato paste
1 teaspoon dry oregano
1 bay leaf
salt & black pepper to taste
1 can black or kidney beans (your choice), washed and drained
1 tablespoon Lee & Perrins Worcestershire sauce

(others)
4 baked large russet potatoes
some non-fat Greek yogurt
some reduced fat Cheddar cheese, grated
some green onion, chopped finely


Instructions
Heat a non-stick frying pan and cook the sausage meat (or ground beef) without oil until it is no longer red.  Remove the meat from the frying pan and drain extra fat on kitchen paper.

In a deep pan heat the olive oil and cook the onion for 4 - 5 minutes.  Add the celery, garlic, serrano peppers, chili power and cumin and cook for further 4 - 5 minutes, or until the spices bathed with the vegetables liquid and become more like paste.

Add the cocoa to the pan and cook for 1 minute stirring well.  Add the tomato and beef stock and bring to a boil.  Return the meat.

Add the tomato paste, oregano and a bay leaf.  Season with salt & pepper, cover with the lid, reduce the heat and cook for about 1 hour.

Add the beans and put back the lid.  Cook for a further 20 minutes.  Season with Worcestershire sauce and additional salt & black pepper as necessary.  Cook for 5 - 6 minutes before serving.

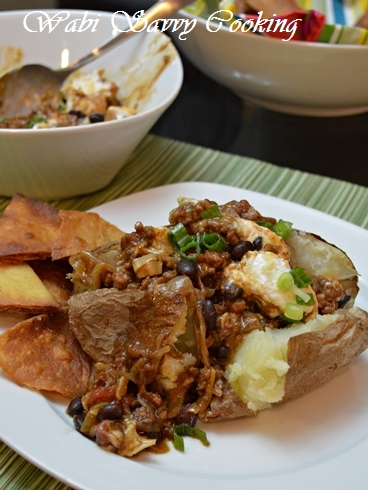
Serve the Chili Con Carne on the baked potatoes, topped with the yogurt, cheese and green onion.


If you would like to read this recipe in Japanese, please click HERE.


Bon appetit!


Thursday, February 21, 2013

Matcha Roll Cake with White Chocolate Cheese Cream


I am from Japan, but personally do not like matcha flavoured sweets.  For me, they are a bit too bitter.

The only matcha flavoured sweet I love is Starbucks Japan's matcha frappuccino.  I know similar matcha flavoured frappuccino is available in America, but, trust me, the one their Japan branches serve to customers is 100 times tastier!  Sooooo...yummy!  If you are a great matcha fan and have a chance to visit Japan, you must try it! 

Having said that however, even if you are a matcha freak, traveling to Japan to taste the frappuccino is not a cheap option.  So why don't you try making the matcha roll cake using my recipe?

I created this recipe inspired by the flavour of Starbucks Japan's matcha frappuccino.  My husband who is British (from the county of tea!) hates any forms of tea, but even he enjoyed this roll cake very much.

I added matcha to the batter of the sponge, but it has none of the strong bitterness of green tea and a very mild flavour.  The filling is sweetened with white chocolate without adding sugar at all and its texture is heavier than whipped cream, but lighter than butter cream.  It is a very delicately delicious roll cake.


Ingredients for 2 rolls
2 tablespoons unsalted butter + extra for greasing the pan
2 tablespoons milk (I used 1% low fat milk)
2.8 oz (80g) cake flour
5 teaspoon cooking matcha*
pinch of salt
4 eggs
4.2 oz (120g) raw cane sugar

(filling)
6.4 oz (180g) mascarpone cheese
1/3 cup heavy whipping cream
1.4 oz (40g) white chocolate, melt in microwave at 1000W for 40 seconds

(Other)
some matcha and powdered sugar for dusting

Note: I usually use metric scales, especially when baking.  I converted the metric figures of my recipe into avoirdupois, but if your scales have a convertible function to metric, I strongly recommend to use the metric figures that I included in the above recipe.

* Cooking matcha is available at Japanese stores, but I actually bought it at the Oriental corner of American supermarkets (QFC).  I will attach a picture of the cooking matcha that I used at the end of this post.


Instructions
Combine the butter and milk in a microwavable dish and heat in a microwave at 1000W for 30 - 40 seconds to melt.  Stir well and leave in a warm place to avoid setting.

Grease an 11 x 16 inch oven tray with the butter and line with parchment paper.  Make sure that each end of the long side has a couple of inches paper hanging over the end of the tray (useful for removing the sponge from the tray when it is baked). 

Sieve the flour, matcha powder and salt together.  Set aside.

With an high speed electric beater, beat the eggs and sugar in a mixing bowl until it becomes thick and pale (it really takes ages, maybe 6 - 7 minutes!), then reduce the speed to low and beat a further 1 to 2 minutes to make the mixture smoother.

Carefully fold the shifted flour mixture into the bowl.

Add the melted butter mixture and fold together making sure not to break the batter's fluffy bubbles.

Spread the batter into the lined tray and smooth the surface.  Gently drop the tray a couple of times on the kitchen surface to remove the air from the batter and spread it out more evenly.

Bake in a preheated oven at 400F for 10 minutes or until a skewer inserted in the centre of sponge comes out clean.

Lift the sides of paper to remove the sponge from the tray to a wire rack, cover it with a large enough parchment paper to prevent it from drying and cool it completely.

To make the filling, place the cheese and cream in a mixing bowl and lightly beat with a whisk until they are incorporated but still a little runny.  Do not over whisk the filling as it will becomes thicker when you add the melted chocolate.

Add the melted chocolate into the cheese mixture and beat until it becomes fully spreadable cream.

Invert the sponge and gently remove the parchment paper that the sponge was cooked with.  Invert the sponge one more time to the parchment paper that you used for the cover (now brown side up) and spread the filling all over the sponge (note that you should be spreading the filling on the "cooked" side of the sponge!).

Starting at one of the long sides, gently roll up the sponge and use the parchment paper to wrap it and hold it in place.  Chill in the fridge for at least 30 minutes before slicing. 

Trim off the each end of roll cake and divide it half and half.  A trick for slicing beautifully is to warm up your knife in hot water, dry with a paper towel, and slice whilst the knife is still hot.  Make sure you clean the knife every single slice!  Dust one piece with the matcha powder and the other with the powdered sugar.

I bought this can of cooking matcha
at my local QFC's Oriental food corner.


If you would like to read this recipe in Japanese, please click HERE.

Bon appetit!


Tuesday, February 19, 2013

Bubble & Squeak Deluxe


Bubble & Squeak is one of the most tasty British inventions! Originally it was cooked with leftovers of mashed potatoes and boiled cabbage.

You do not have to wait until you have some leftovers.  You can cook it from scratch too.

Here, I am introducing a recipe for a delicious modification to Bubble & Squeak.  Mine is meaty and voluminous and it becomes a beautiful hearty dinner when served with yolky fried eggs or canned baked beans.


Ingredients for 3 - 4 people
about 1/8 cabbage, remove the heart and roughly chopped
1 small carrot, peel and roughly chopped
2 slices fatty bacon, chopped finely
1 tablespoon butter, divided
1/2 sweet onion, chopped finely
1/2 bell pepper (any colour), chopped finely
2-3 mushroom, chopped finely
1 stick celery, chopped finely
2 large russet potatoes, peel, boiled and mashed
1 tablespoon chopped parsley
1 teaspoon garam masala
salt and black pepper to taste


Instructions
Put enough water into a small pan that will cover the cabbage and carrot, and bring to the boil.  Add the cabbage and carrot, put on the lid and simmer for 20 - 25 minutes or until they become soft.  Drain and leave them to cool.  Wrap the cabbage in a piece of kitchen paper and squeeze lightly to remove excess water.  Chop the vegetables finely.

Heat a non-stick frying pan and cook the bacon until it browns and lots of fat comes off.  With a slotted spoon, remove the bacon to a plate and dab the bacon using a piece of kitchen paper to remove excess fat, but make sure you leave the bacon fat that's still in the frying pan for the next step.

In the same frying pan, heat the half of the butter and cook the onion, bell pepper, mushroom and celery for 5 - 6 minutes or until the vegetables become soft.

Return the bacon to the frying pan and add the cabbage, carrot and parsley.  Cook for a minute or two.

Add the mashed potato and stir well in order to combine the bacon and vegetables into the potato evenly.  Season with garam masala, salt & black pepper.

Now, with the back side of wooden spoon, press the mixture into a large thick pizza shape.  Cook over the medium heat for about 10 minutes or until the bottom of potato cake becomes brown.  Gently shake the frying pan every so often making sure the bottom does not stick to the pan.

Invert the potato cake to a large enough plate.  Melt the rest of butter in the frying pan and slide the potato cake back.  Cook a further 10 minutes or until the new bottom side also becomes brown.

Cut the Bubble & Squeak into 8 wedges and serve hot with some yolky fried eggs or canned baked beans. 


If you would like to read this recipe in Japanese, please click HERE.

Bon appetit!

Sunday, February 17, 2013

Battenburg Cake


One of my favourite British cakes is Battenburg cake which is a sort of variation on a Victoria sponge cake.

Battenburg cake is made of four sponge bars of which two are pink and the other two are yellow.  Four sponge bars are alternated in a checkerboard pattern and wrapped with marzipan.  It has a deliciously delicate scent of almonds.

Last Christmas I made a Christmassy version of Battenburg cake using two typical Christmas colours - red and green.  Rather than the classic 4 checkerboard pattern, I made the cake a little bit more complicated using sixteen sponge bars.

I wrapped my cake with cellophane sheet to add to the distinctive four by four pattern and gifted to one of my girlie friends.

The cake looked so pretty and tasted beautiful.  It surely was a tasty Christmas present for her!


Ingredients for 1 cake (6~8 people)
6 1/4 oz butter softened + extra for greasing
6 1/4 oz sugar
3 eggs, lightly beaten
3/4 cup self rising flour, sieved
few drops vanilla extract
1//4 teaspoon red food colouring
1/4 teaspoon green food colouring
some apricot jam
14oz ready made marzipan
powdered sugar for dusting


Instructions
Grease and then line two 7 inch square cake tins with parchment paper.  Place a large mixing bowl on scales and weigh it.  Write down the weight of bowl in order not to forget.

Combine the butter and sugar in the mixing bowl and mix well until pale and fluffy.

Beat in the eggs to the butter mixture, a little at a time, beating well between each addition.

Carefully fold the flour into the mixture, then stir in vanilla extract.

Place the mixing bowl on scales again and subtract the net weight of bowl that you wrote down to find the weight of batter.  Transfer the exactly half weight of batter into another mixing bowl.

Stir in the red food colouring to one of the mixing bowls and the green food colouring to the other mixing bowl.

Spoon the two different colour batters into the individual cake tins.  Bake both together in a preheated oven at 325F for 25-30 minutes, or until a skewer inserted in the centres of the sponges come out clean.

Leave the sponges in the tins for 5 - 6 minutes, then turn them out to a wire rack.  Remove the parchment paper and leave to cool completely.

Trim the edges of the sponge cakes making sure the two cakes are exactly same size.  Cut each sponge into 8 equal rectangles.

Take 2 red and 2 green rectangles of the sponge cakes and place the red, green, red and green sponges side by side, spreading the apricot jam for each joint as glue.

Spread the apricot jam all over the top of first layered sponges.  Place next 2 red and 2 green sponges on top of the first layered sponges alternating the colors like a checkerboard.

Spread the apricot jam on top of the second layered sponges and repeat for the third and forth layers.  The apricot jam should also be spread on top of the fourth layer of sponge.

Roll out the marzipan on a surface lightly dusted with the powdered sugar into about 8 x 18 inch rectangle (it should be large enough to wrap the cake completely).

Turn the cake upside down onto the middle of marzipan and spread the apricot jam all over the front, back and top sides of the cake.

Wrap the marzipan around the cake, trim the each end of marzipan, overlap and pinch them to seal.

Place the seam side down and trim off each side.


If you would like to read this recipe in Japanese, please click HERE.

Bon appetit!